P6 Admin Tool
Import Global Activity Codes
or Project Codes
Export timesheets from Primavera
Convert Microsoft Project
to Primavera P6 .xer file
Convert Microsoft Project
from .mpp format to .mpx format file
Convert Primavera Project
to Microsft Project
Import WBS from XER file or Excel File
LDAP Authentication for Primavera P6
System Settings
- Set user for P6 API Connection
Primavera P6 Admin Tool
Launch Primavera P6 Admin Tool
This tool will assist you to finish most P6 Administration tasks from a PC with P6 Professional Client installed. You don't have to deploy a Weblogic Server for Primavera P6 EPPM administration and that is good for a small firm want to run P6 EPPM without the complexity of running a Weblogic Appliation Server.To launch this P6 Admin Tool, first download this tool from www.eppmsoft.com, then must extract the ZIP file to a folder in your local disk. Next, open the folder where the files are unzipped, and find runP6AdminTool.cmd file and double-click it to start this Primavera P6 Administration Tool.
If you just use this tool to convert Microsoft Project (2003/2007/2010/2013/2016 ) to Primavera XER file, or convert Microsoft Project from .mpp format to .mpx format file, or recover Primavera database password, or reset user password, then you don't need to enter P6 user credentials for the P6 API connections. If you want to use this tool for Primavera P6 EPPM Administration, such as create EPS, OBS, etc., then click Users menu, and hit System Settings menu. In the System Settings page, enter a valid P6 user account, and save it, and after that, you should have no problems creating new user account, changing P6 user password, set up EPS, OBS, or Project Codes.
After this P6 admin tool / utility is started, you can do all the P6 administration tasks, including user management, user preferences, enterprise data, and application settings, etc.
Import Global Activity Codes/Project Codes
If you use this utility to import Activity Codes/Project Codes, please first copy the Excel template file named activity_codes_template.xls in the same folder as this utility. Next open the new copy of the template and add your data to the template according to the columns. Then, run this utility and click "The Global Settings" menu, and select "Enterprise Data" menu, and click "Activity Codes - Global", finally hit the Import button and follow the wizards to complete the import.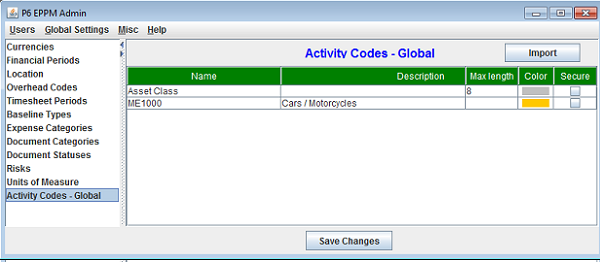
To confirm the activity codes are imported, launch Primavera P6 Windows Client, and click Enterpise menu, then select Activity Codes menu. You should see the codes being showed there.
Export timesheets from Primavera
To export timesheets from Primavera, click "The Global Settings" menu, and select "Enterprise Data" menu, and click "Timesheet Periods", and you will see the latest 10 weeks Timesheets are populated in the table (see the screenshot below). If the Timesheet Periods in the screen are not the one you want to export, please change the start date and end date manually.
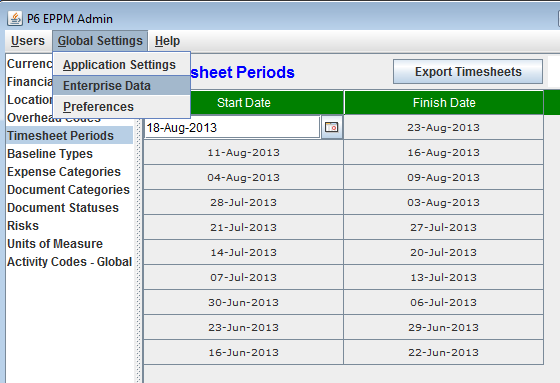
For example, I want to export the timesheet period from 31-Oct-2010 to 6-Nov-2010. Click the first row of the timesheet table, and change the start date to 31-Oct-2010, and Finish Date to 06-Nov-2010. Finally, make sure this row is selected, and click Export Timesheets.

If Primavera contains timesheets for this period, you should see the excel file was created in your Desktop.

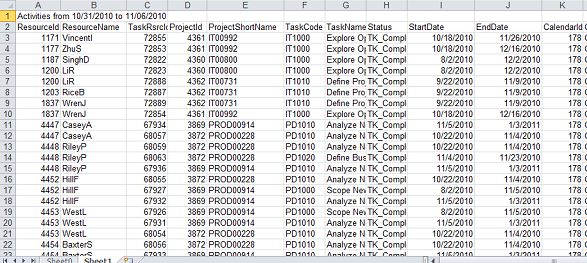
Now open your Excel timesheets file, and you will see two sheets were created. Sheet0 contains the timesheets, and Sheet1 contains the activities related to the timesheets so that you can verify the timesheets using the start date, end date, and calendar.

Convert Microsoft Project to Primavera P6 .xer file
You may need to convert your project data from Microsoft Project to Primavera P6, and Oracle Primavera already provides the mechanism for this purpose, for example, P6 allows you to import Microsoft Project to P6 by reading .mpp, .mpx, .xls, or .xml format file. However, in most cases, you will be disapointed with Primavera built-in import functions because you always receive error message that says the Primavera import completed with error and nothing is imported. Based on such a requirement, we offer you a new way to import MS Project to P6 by generating a .xer file from MS Project .MPP file. With this utility, you don't need to install Microsoft Project in the computer to do the conversion and it works with any version of Microsoft Project, including 2003, 2007, 2010, 2013, and 2016. The P6 Admin Tool will also convert the custom fields and outline number (outline code) in MS Project into P6 activity codes, and assign the activity codes to their activities automatically. It also exports the Unique ID field in MS Project task into P6 UDF called "MSP Unique Id".
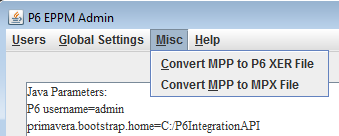
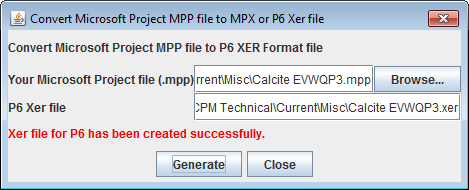
To convert Microsoft Project to Primavera P6 .xer file, click the Misc menu, then select "Convert MPP to P6 Xer File" menu, and the screen below should appears. Click "Browse" button to select Microsoft Project .MPP file to convet, and the appropriate .xer file name is generated automatically in the same folder as your MS Porject file. Finally, hit the Generte button to finish.
Convert Microsoft Project from .mpp format to .mpx format file
This utility also allows users to convert Microsoft Project from .mpp format to .mpx format. Microsoft supports .mpx format file since MS Project 98, it can be used to exchange project data between two different Project Managemnet software, for example, Primavera P6 is able to import .mpx file directly.
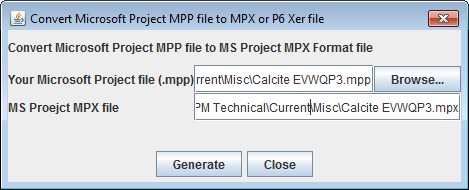
To convert Microsoft Project from .mpp format to .mpx format file, click the Misc menu, then select "Convert MPP to MPX File" menu, and the screen below should appears. Click "Browse" button to select Microsoft Project .MPP file to convet, and same name with .mpx extension file name is generated in the MS Project MPX File field automatically. Finally, hit the Generte button to finish.
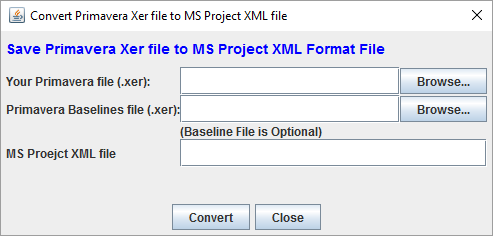
Convert Oracle Primavera Project to Microsoft Project
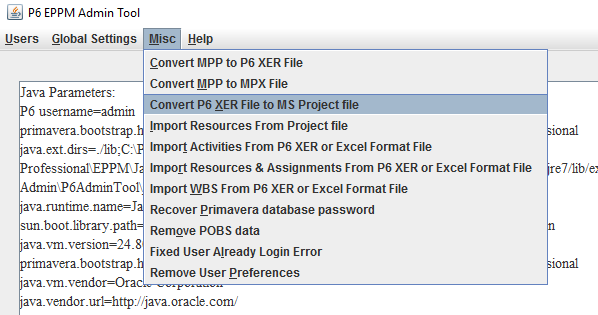
You may need to convert your project data from Primavera P6 to Microsoft Project, and this Primavera P6 Admin Tool can help you to achieve it. Oracle Primavera P6 has built-in functions for you to save P6 project to XML format Microsoft Project file, but most P6 users found it useless.With Primavera P6 Admin Tool, you can easily create a Microsoft Project file from P6 project. To migrate your Primavera P6 project using P6 Admin Tool, go to the Misc menu, and select "Convert P6 XER file to MS Projectt file", and the Convert P6 Project to MS Project screen should appear. It will ask you for the .xer format Primavera project file, and you have an option to provide a P6 project baselines. To generate XML based MS Project file, just hit the Convert button, it will save it as XML format Microsft Project file in the same folder as your P6 XER file. Then, you can open the xml format Microsoft Project File with any version of Microsoft Project, including 2003, 2007, 2010, 2013, and MS Project 2016. If you export your P6 project to Microsoft Project using Primavera built-in functions, and try to open the XML format MS Project file with Microsoft Project 2013 or later version, and got this error - "An import error occurred. The element <Name> in the <Calendar> element with <UID>=7 has invalid data. The calendar name does not exist. Click a calendar in the list, and then press Enter.", you can use P6 Admin Tool to fix this issue.
Import WBS from XER file or MS Excel.
Primavera P6 Admin Tool also have the capability for you to import WBS from XER format file or Microsoft Excel file. There is a template file called wbs.xls for you to create an appropriate Excel format file for this tool to import your WBS. The wbs.xls file is located in the same folder as this tool's executable file. You can find the wbs import menu under the Misc menu.
Configure LDAP Authentication for Primavera P6.
Most organizations deploy Active Directory server as user repository and use it as a centralized LDAP authentication server. LDAP authentication is well support in Primavera P6. The P6 Admin Tool is able to help you to configure LDAP authentication for P6. To access this function, go to Users menu, then LDAP Authentication Setup. Here is the screenshot you should see.
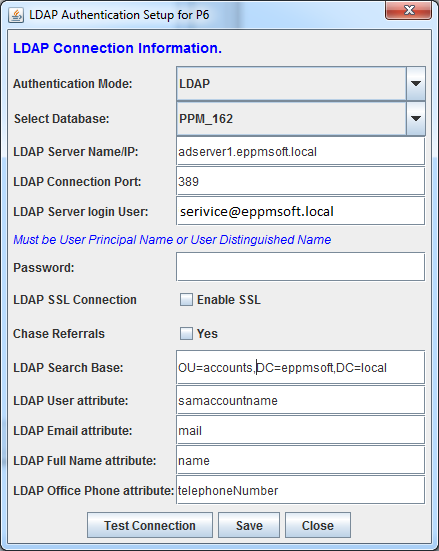
To set up LDAP authentication for P6, fill out the requried fields, and hit "Test Connection" until you get "The connection is successful" message, then click "Save" button to finish the configuration.
System Settings
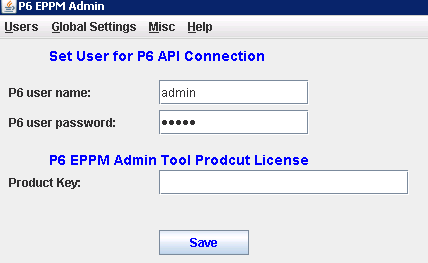
You can configure the P6 user account for P6 API connection. The user credentials are encrypted if you set from System Settings function. To open this screen, click User menu, then hit System Settings, and the screen similiar the figure below should appears. In the P6 User Name field, the default is admin, and the default password is admin, please change accordingly. To save, hit the Save button. Optionally, you can enter the Product key to make sure the admin tool still functions after 30-day trial period.